If you are running a CyberPanel server with OpenLiteSpeed, you may eventually run into an annoying problem where a Cyberpanel self signed certificate is issued instead of a proper Let’s Encrypt SSL certificate.
Even worse, no matter what you try – deleting the website, recreating it, checking DNS, or reissuing SSL from the CyberPanel interface – the server stubbornly keeps generating the same self signed certificate.
I recently encountered this exact issue on one of my servers, and after trying every common fix mentioned in forums and guides, nothing worked.
The surprising solution ended up being a simple CyberPanel CLI command that almost no guides seem to mention.
If you are stuck with a CyberPanel self signed certificate problem, here is the fix that finally worked.
The Problem: CyberPanel Keeps Issuing a Self Signed Certificate
Normally when you click “Issue SSL” inside CyberPanel, the panel contacts Let’s Encrypt and generates a valid certificate for your domain.
However, when something goes wrong during the validation process, CyberPanel sometimes falls back to issuing a temporary self signed certificate instead.
This results in browsers showing warnings like:
- “Your connection is not private”
- “Certificate not trusted”
- SSL issued by OpenLiteSpeed self signed certificate
In many cases, administrators try the usual troubleshooting steps:
- Checking DNS records
- Ensuring the domain resolves to the correct server IP
- Turning off Cloudflare proxy
- Deleting and recreating the website
- Reissuing SSL from the CyberPanel dashboard
Unfortunately, none of those fixes worked in this case.
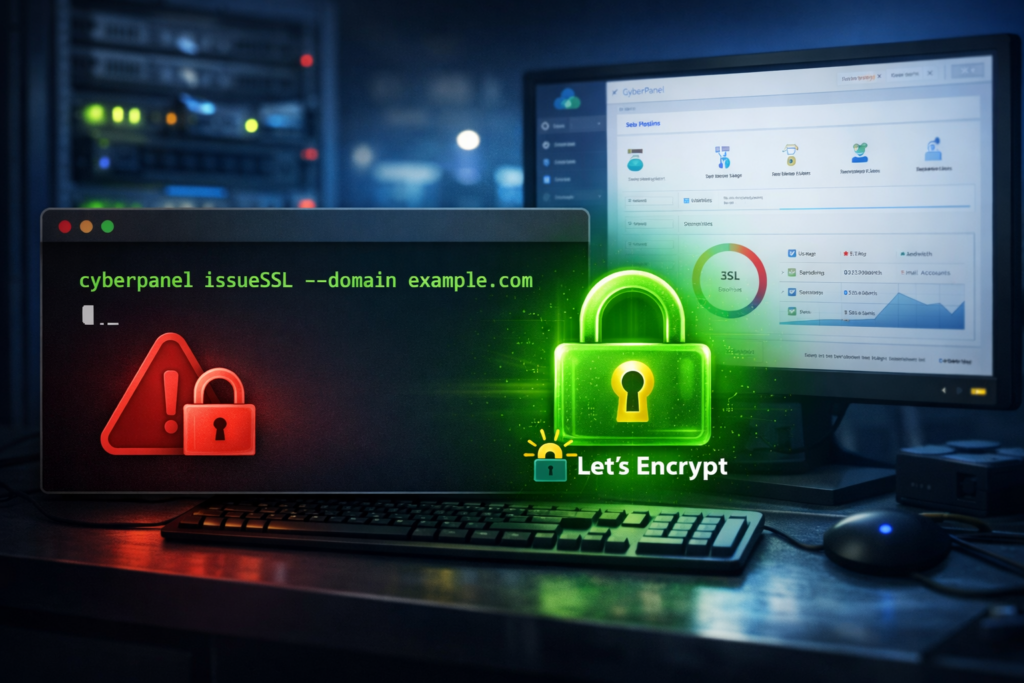
The Solution: Issue SSL Using the CyberPanel Command Line
After digging deeper, I discovered that forcing the SSL generation via the CyberPanel command line interface successfully generated the correct Let’s Encrypt certificate.
The command is:
cyberpanel issueSSL --domain yourdomain.com
For example:
cyberpanel issueSSL --domain dijitul.uk
Once this command was run on the server, CyberPanel immediately generated the correct certificate and replaced the self signed one.
Within seconds, the domain was serving a valid Let’s Encrypt SSL certificate.
Why This Works
Sometimes the CyberPanel web interface fails to trigger the full SSL issuance process properly.
Using the CLI command bypasses the panel interface and directly runs the internal CyberPanel SSL generation process, which forces the Let’s Encrypt challenge and certificate creation.
In cases where the UI keeps issuing a self signed certificate, this command can successfully complete the process.
Other Things to Check Before Running This
Although the command above fixed the issue instantly, you should still confirm a few basics:
1. DNS Is Correct
Your domain must point to the correct server IP address.
2. Port 80 Is Accessible
Let’s Encrypt validation requires HTTP access.
3. Cloudflare Proxy Is Disabled
If you are using Cloudflare, temporarily set the DNS record to DNS Only instead of proxied.
Once the certificate has been issued successfully, you can usually turn the proxy back on.
—–
If you are stuck with a CyberPanel self signed certificate issue, and the panel keeps generating the wrong SSL certificate no matter what you try, running the following command may solve it instantly:
cyberpanel issueSSL --domain yourdomain.com
It’s a simple fix that surprisingly isn’t mentioned in many CyberPanel help guides, but it can save a huge amount of troubleshooting time.
Hopefully this helps anyone dealing with the same CyberPanel self signed certificate problem. If you are still having issues then get in touch.
Cyberpanel self signed certificate issue FAQs
Why does CyberPanel create a self signed certificate?
CyberPanel may generate a self signed certificate when the Let’s Encrypt validation process fails. This can happen if DNS is incorrect, port 80 is blocked, Cloudflare proxy is enabled, or the SSL request fails through the CyberPanel interface. In these cases, CyberPanel temporarily issues a self signed certificate so the site can still serve HTTPS.
How do I fix a CyberPanel self signed certificate?
One of the quickest ways to fix a CyberPanel self signed certificate is to force SSL issuance using the CyberPanel CLI command;
cyberpanel issueSSL –domain yourdomain.com
Running this command directly on the server can trigger the Let’s Encrypt process correctly and replace the self signed certificate with a valid SSL certificate.
Why does the CyberPanel dashboard fail to issue SSL?
In some situations the CyberPanel dashboard fails to properly trigger the Let’s Encrypt validation process. This may be due to temporary panel bugs, failed background tasks, or server configuration issues. Running the SSL issuance command through the CyberPanel CLI bypasses the interface and often completes the process successfully.
Leave a Reply